How to Build a DIY Portable Secondary Screen for Laptops Using Recycled Parts
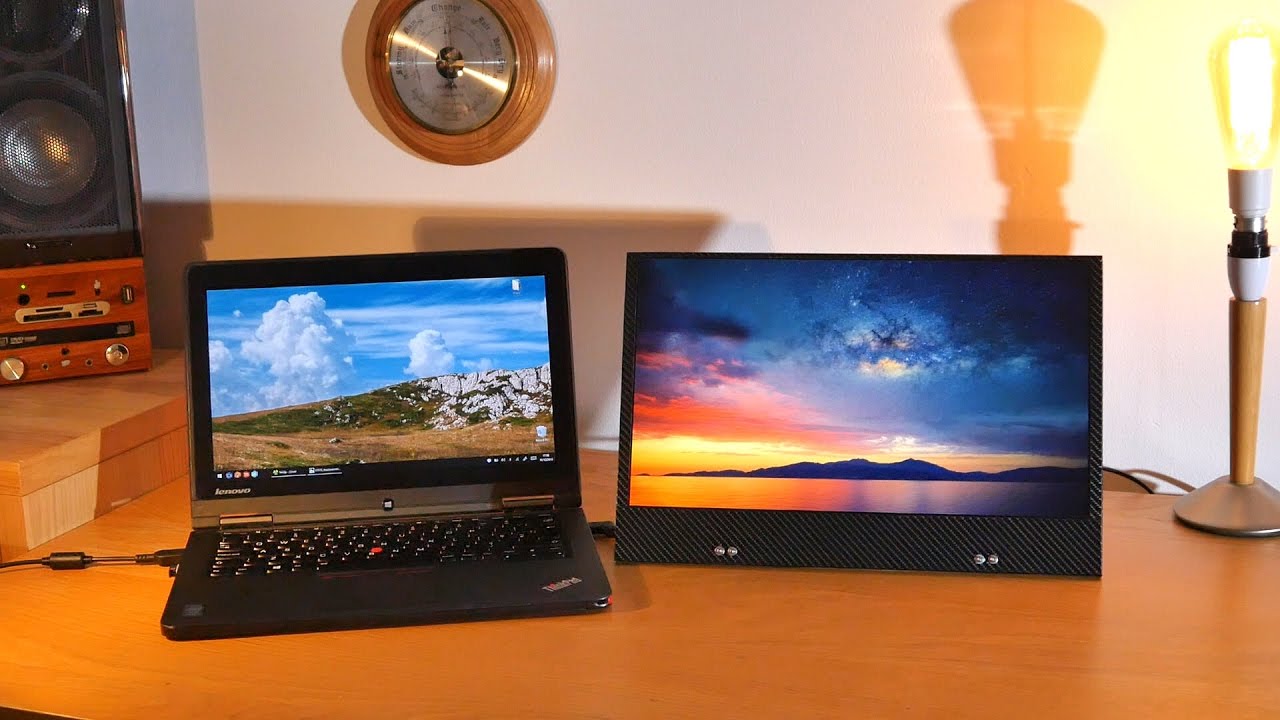
Are you tired of having only one main screen on your laptop? Well, you’re in luck! DIY Perks has a video tutorial on how to build a DIY portable secondary screen for laptops using recycled parts. And the best part? It only costs around $25! This DIY screen is not only budget-friendly, but it also performs remarkably well and has a unique industrial look. In the video, you will learn how to source the necessary parts from eBay, including the control board for your specific laptop screen. You will also learn how to build a sturdy casing using thin MDF board, cover it with vinyl wrap, and secure the screen with epoxy and vinyl strips. The DIY screen can be powered using a power adapter or by connecting it to your laptop’s power supply with the use of an extender and voltage step-down board. This portable screen can be used with a laptop or as a secondary screen for a desktop computer. So why settle for one screen when you can have two? Upgrade your laptop experience and boost your productivity with a DIY portable secondary screen using recycled parts!
Build a DIY Screen out of Recycled Parts for Cheap
Are you tired of using just a single main screen on your laptop? Do you want to increase your productivity by having a secondary monitor? If so, then building a DIY portable secondary screen for laptops using recycled parts is the perfect solution for you. Not only will it perform well, but it will also have a unique industrial look. And the best part? It will only cost you around $25! In this article, we will guide you through the step-by-step process of building your own DIY screen.

This image is property of i.ytimg.com.
Materials Needed
Before we get started, here are the materials you will need for this project:
- Old laptop with a working screen
- Control board for the specific laptop model
- Thin MDF board
- Vinyl wrap
- Epoxy
- Vinyl strips
- Thin aluminum sheet
- Hinges from the old laptop
- Power adapter or extender and voltage step down board
- Optional: Squarespace free trial
Now that we have all the necessary materials, let’s dive into the process of building the DIY screen.
Finding the Parts
The first step is to gather all the required parts for your DIY screen. Here’s how you can find each component:
-
Searching for an old laptop with a functioning screen: Look for an old laptop that has a working screen. It doesn’t matter if the laptop itself is no longer functional as long as the screen is in good condition.
-
Locating a control board for the specific laptop model: Once you have the old laptop, remove the screen and locate the model number on the back. Use this model number to search for a compatible control board on websites like eBay. Make sure to sort the results by price to find the best deal.
-
Sourcing thin MDF board, vinyl wrap, epoxy, vinyl strips, and thin aluminum sheet: You can find these materials at your local hardware store or online. MDF board is commonly used for casings and can be cut to the desired size. Vinyl wrap will give your DIY screen an industrial look. Epoxy will be used to secure various components. Vinyl strips will be used for finishing touches. And a thin aluminum sheet will provide additional protection.
-
Retrieving hinges from the old laptop: Remove the hinges from the old laptop screen. These hinges will be reused to support your DIY screen.
-
Obtaining a power adapter or extender and voltage step down board: You will need a power adapter or extender to connect the screen. Make sure the voltage matches the screen’s requirements. Alternatively, you can use a voltage step down board to connect the screen to the laptop’s power supply.
-
Considering Squarespace free trial for other DIY projects: Squarespace offers a free trial for building professional-looking websites. Take advantage of this trial period to explore other DIY projects.
Now that you have all the parts, let’s move on to the next step.
Removing the Laptop Screen
Before building the casing for your DIY screen, you need to remove the laptop screen from its casing. Here’s a step-by-step guide on how to do it:
- Disassemble the old laptop carefully, following the manufacturer’s instructions.
- Disconnect the cables connected to the back of the laptop screen. Take extra care not to damage the cables.
- Remove the screen from its casing, ensuring that you handle it gently to prevent any cracks or damage.
- Set aside the laptop screen for later use in the DIY screen.
Now that you have successfully removed the laptop screen, it’s time to start building the casing.
Building the Casing
The casing will provide support and protection for your DIY screen. Follow these steps to build the casing:
- Measure and cut the MDF board to the desired dimensions for the casing. Make sure to leave enough space to fit the laptop screen.
- Assemble the cut pieces of MDF board to form a rectangular box. Use screws or nails to secure the corners.
- Double-check the dimensions to ensure that the laptop screen will fit snugly inside the casing.
- Use sandpaper to sand and smooth the edges of the MDF board, giving it a polished look.
Now that the casing is ready, let’s move on to the next step.
Adding the Industrial Look
To give your DIY screen an industrial aesthetic, you will be applying vinyl wrap to the MDF casing. Here’s how you can do it:
- Measure and cut the vinyl wrap to the dimensions of the MDF casing, leaving a little extra for a clean finish.
- Apply the vinyl wrap to the MDF casing, starting from one side and smoothing it out as you go. Use a hairdryer to soften the adhesive for a secure fit.
- Trim the excess vinyl to ensure a clean and neat finish.
- Admire the industrial look of your DIY screen!
With the industrial look complete, let’s move on to the next step.
Securing the Screen
Now it’s time to secure the laptop screen inside the casing. Follow these steps to ensure a secure fit:
- Attach the control board to the back of the laptop screen, following the manufacturer’s instructions.
- Connect the cables from the control board to the laptop screen properly. Double-check the connections to ensure they are secure.
- Position the laptop screen inside the casing, making sure it fits snugly. Adjust the positioning if necessary.
- Use epoxy and vinyl strips to hold the laptop screen in place. Apply epoxy around the edges of the screen and secure it using the vinyl strips.
- Attach a thin aluminum sheet to the back of the casing for additional protection. This will prevent any accidental damage to the screen.
- Use the hinges from the old laptop to support the screen. Attach them to the casing, ensuring they are securely in place.
Now that the screen is securely installed, let’s move on to the next step.
Powering the Screen
To power your DIY screen, you will need a power adapter or extender. Here’s how you can do it:
- Use a power adapter to connect the screen. Make sure the voltage matches the screen’s requirements. Plug the power adapter into a power source.
- Alternatively, you can use an extender and voltage step down board to connect the screen to the laptop’s power supply. Follow the manufacturer’s instructions to ensure a proper connection.
Now that the screen is powered, let’s move on to the next step.
Using the DIY Screen
Now that you have successfully built your DIY screen, you can start using it with your laptop or desktop computer. Here’s how you can use it as a secondary display:
- Connect the DIY screen to your laptop or desktop computer using the appropriate cables.
- Configure the display settings on your computer to use the DIY screen as a secondary display.
- Enjoy the flexibility and convenience of having an extra screen for multitasking and increased productivity.
Now that you have your DIY screen up and running, let’s move on to the final section.
Considering Other DIY Projects
If you enjoyed building and using your DIY screen, consider exploring other DIY projects during your free time. One option to consider is utilizing the Squarespace free trial for creating professional-looking websites. Here are some reasons why you should consider it:
- Squarespace offers a variety of templates that make it easy to create a website that looks professional.
- You can customize your website to fit your specific needs using the settings provided by Squarespace.
- Building a website using Squarespace requires no additional software and can be done directly from your browser.
Take advantage of the Squarespace free trial to make the most of the resources available for your DIY endeavors.
Conclusion
Building a DIY portable secondary screen for laptops using recycled parts is both fun and cost-effective. With just a few materials and some basic tools, you can create a unique and functional DIY screen. Whether you’re using it as a secondary display for your laptop or as an extra screen for your desktop computer, the DIY screen will enhance your productivity and multitasking capabilities. So, gather your materials and get started on your own DIY screen project today!
Laptop users like you often have to settle for just one main screen. However, with the help of upcycling, you can create your own portable secondary screen for your laptop using recycled parts, all for a budget-friendly cost of $25! Not only does it perform exceptionally well, but it also has a unique industrial design – a real gem of a tech piece! Once you experience the convenience of two screens, you won’t want to go back.
Here are the links to the parts you’ll need:
Disclosure: These links are affiliate links. By clicking on them and making a purchase from the respective merchants, DIY Perks earns a commission. Affiliate programs and affiliations include, but are not limited to, the eBay Partner Network and Amazon Associates.
Control board:
- For US buyers: eBay Control Board Link (Make sure to add the model number as shown in the video, including any suffixes like (sp) or (k1))
- For UK buyers: eBay Control Board Link
If your screen model isn’t listed, don’t worry. Most sellers of control boards allow you to contact them directly and they will program a control board specifically for your screen at no additional cost. Just provide them with the model number, and you’re good to go.
Vinyl Wrap:
- For eBay US: eBay Vinyl Wrap Link
- For eBay UK: eBay Vinyl Wrap Link
Please note that this video is sponsored by Squarespace.
Are you interested in building your own website? Visit Squarespace for a free trial and get 10% off.
OFFICIAL LINKS:
- Support me on Patreon: /diyperks
- Official Website: diyperks.com
- Discord: diyperks.com/discord-server/
- Forums: diyperks.com/community/
- Twitter: /diyperks


