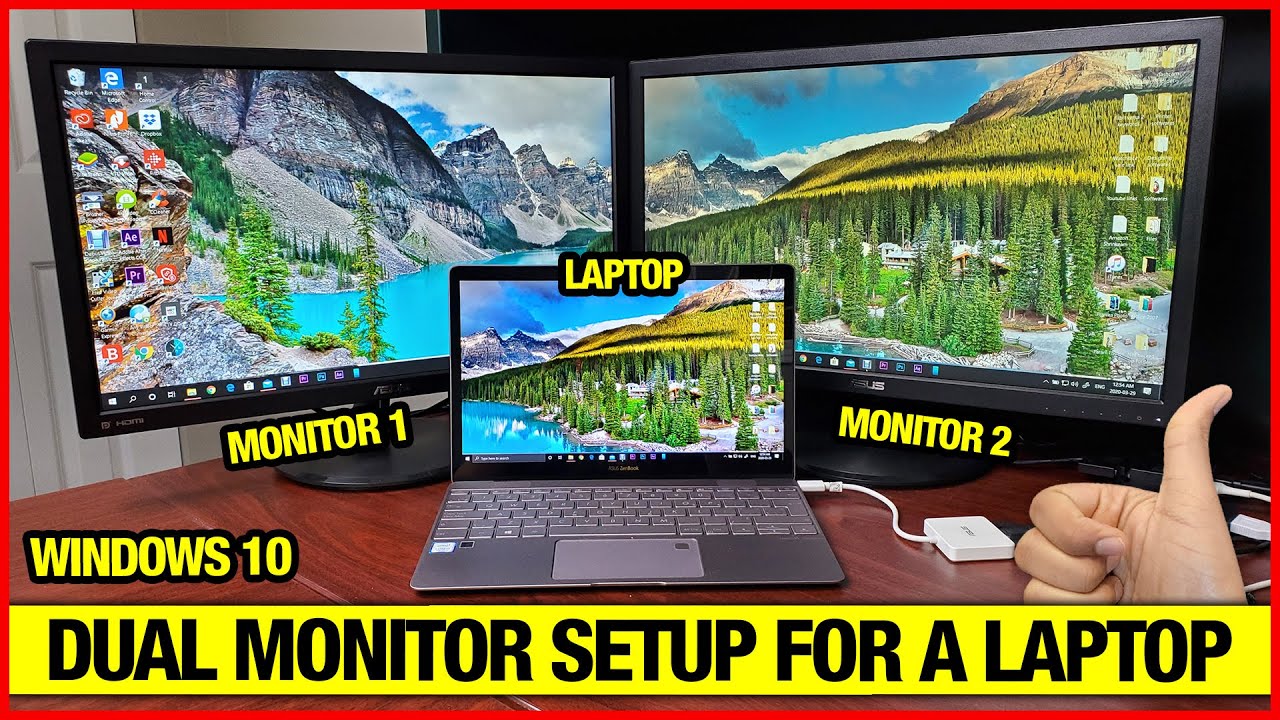
In this informative video by Vids Tube, you will learn how to set up dual monitors on a Windows 10 laptop that only has a single USB C port. The video provides a step-by-step tutorial on connecting monitors to laptops with limited ports, and it offers various adapter options for different monitor setups. The YouTuber recommends using a USB C to USB C charging input HDMI and USB 3.0 port adapter to connect one monitor, and suggests an HDMI female to USB 3.0 male adapter for additional monitors. The video also demonstrates how to change projection settings and arrange screen orientation in the display settings. If you’re looking for an affordable and effective way to set up dual monitors on your Windows 10 laptop, this video is a must-watch.
Are you struggling to set up dual monitors on your Windows 10 laptop with only one USB C port? Look no further! In this comprehensive tutorial by Vids Tube, you’ll find all the information you need. From adapter options to changing projection settings, the video covers everything step by step. Whether you’re a student or a professional, setting up a dual monitor system can greatly enhance your productivity. So, grab your laptop and USB C adapters, and get ready to unlock the benefits of a dual monitor setup!
Overview of Dual Monitor Setup
Welcome to this comprehensive article on setting up a dual monitor system for a laptop with a single USB C port on Windows 10. In this article, we will guide you through the entire process, from connecting the monitors to configuring the display settings. We will also explore various adapter options and discuss additional accessories that can enhance your dual monitor setup. By the end of this article, you will have all the information you need to create an efficient and effective dual monitor setup for your laptop.
Introduction to dual monitors on Windows 10
Dual monitors provide users with the ability to multitask more efficiently, increase productivity, and enhance their overall computing experience. With a dual monitor setup, you can have multiple windows open and easily switch between them, compare documents side by side, and effortlessly drag and drop files between screens. This setup is especially useful for professionals who need to work on multiple applications simultaneously or gamers looking for an immersive experience.
Advantages of using dual monitors
There are several advantages to using dual monitors. Firstly, it provides you with more screen real estate, allowing you to have multiple applications and windows open at the same time without cluttering your workspace. This can significantly improve your productivity as you can easily reference multiple sources of information or work on different tasks simultaneously.
Secondly, a dual monitor setup enables you to organize your work more efficiently. Instead of constantly switching between tabs or windows, you can have each application or task on its own dedicated screen. This can streamline your workflow and save you time that would otherwise be spent searching for the right window or document.
Lastly, dual monitors can enhance your entertainment experience. Whether you’re watching movies, playing games, or editing photos and videos, having an extended display can provide a more immersive and visually stimulating experience. With dual monitors, you can enjoy larger, more detailed visuals, and have additional screen space for editing tools, timelines, or chat windows.
Introduction to USB C port and its capabilities
A USB C port is a versatile and advanced type of connector that has become increasingly common in modern laptops and devices. It offers a range of capabilities, including data transfer, power delivery, and display connectivity. A single USB C port can support multiple functions simultaneously, making it ideal for connecting external displays.
USB C ports can transmit video signals using the DisplayPort protocol, allowing for high-resolution displays and seamless transmission of audio and video. This makes it a convenient option for connecting monitors to laptops or devices without dedicated display ports, such as HDMI or VGA.
Additionally, USB C ports can also provide power to connected devices, making it possible to charge your laptop or other devices while using the dual monitor setup. This eliminates the need for separate power adapters or chargers and simplifies cable management.
With the introduction of USB C ports, connecting multiple monitors to a laptop has become easier and more convenient. In the following sections, we will explore different adapter options that utilize USB C connectivity to enable a dual monitor setup.

This image is property of i.ytimg.com.
Adapter Options for Connecting Monitors
When setting up a dual monitor system for a laptop with a single USB C port, you will need adapter options that allow you to connect the monitors successfully. Here are two common adapter options that utilize USB C connectivity:
USB C to USB C charging input HDMI and USB 3.0 port adapter
One of the most versatile and convenient adapter options for connecting a single monitor to a laptop with a USB C port is a USB C to USB C charging input HDMI and USB 3.0 port adapter. This adapter allows you to charge your laptop while also providing an HDMI port for connecting the monitor and a USB 3.0 port for additional peripheral devices.
The USB C to USB C charging input HDMI and USB 3.0 port adapter is lightweight and portable, making it ideal for users who frequently travel or need to set up a dual monitor system on the go. It supports high-resolution displays and ensures a stable and reliable connection between your laptop and the monitor.
HDMI female to USB 3.0 male adapter
For additional monitors in your dual monitor setup, you will need an HDMI female to USB 3.0 male adapter. This adapter allows you to connect another monitor to your laptop using the USB 3.0 port. Simply plug the HDMI cable into the adapter and connect it to the monitor to expand your display.
The HDMI female to USB 3.0 male adapter is an affordable option for adding extra monitors to your setup. It is compatible with most HDMI cables and supports high-definition resolutions. This adapter is lightweight and compact, making it easy to carry and set up wherever you go.
In the next section, we will guide you through the process of connecting the first monitor to your laptop using the USB C to USB C charging input HDMI and USB 3.0 port adapter.
Connecting the First Monitor
To connect the first monitor to your laptop, follow these steps:
Step 1: Plug in the USB C to USB C charging input HDMI and USB 3.0 port adapter
Start by plugging the USB C to USB C charging input HDMI and USB 3.0 port adapter into the USB C port on your laptop. Ensure that the connection is secure and stable.
Step 2: Connect the HDMI cable to the adapter and the monitor
Next, connect one end of the HDMI cable to the HDMI port on the adapter and the other end to the HDMI port on the monitor. Ensure that the HDMI cable is securely plugged in to avoid any display or connectivity issues.
Step 3: Configure the display settings for the first monitor
Once the physical connections are complete, it’s time to configure the display settings for the first monitor. On your laptop, open the Display settings by right-clicking on the desktop and selecting Display settings from the context menu.
In the Display settings, you will see a visual representation of your monitors. Click on the first monitor and adjust the settings according to your preferences. You can change the resolution, orientation, and other display settings as needed. Experiment with different configurations until you find the setup that works best for you.
Congratulations! You have successfully connected and configured the first monitor in your dual monitor setup. In the next section, we will guide you through the process of connecting additional monitors using the HDMI female to USB 3.0 male adapter.
Connecting Additional Monitors
To connect additional monitors to your dual monitor setup, follow these steps:
Step 1: Plug in the HDMI female to USB 3.0 male adapter
Start by plugging the HDMI female to USB 3.0 male adapter into one of the available USB 3.0 ports on your laptop. Ensure that the connection is secure and stable.
Step 2: Connect the HDMI cable to the adapter and the monitor
Next, connect one end of the HDMI cable to the HDMI port on the adapter and the other end to the HDMI port on the additional monitor. Ensure that the HDMI cable is securely plugged in to avoid any display or connectivity issues.
Step 3: Configure the display settings for the additional monitors
Once the physical connections are complete, it’s time to configure the display settings for the additional monitors. Open the Display settings on your laptop and navigate to the Multiple displays section.
Click on the dropdown menu and select the desired display mode for the additional monitors. You can choose to extend the desktop across all monitors, duplicate the display on all monitors, or use one monitor as the main display and the others as secondary displays. Adjust the resolution, orientation, and other display settings for each monitor as needed.
Repeat these steps for each additional monitor you want to connect to your dual monitor setup.
Congratulations! You have successfully connected and configured additional monitors in your dual monitor setup. In the next section, we will guide you through adjusting the projection settings and screen orientation.
Adjusting Projection Settings and Screen Orientation
Adjusting the projection settings and screen orientation is an important step in optimizing your dual monitor setup. By customizing these settings, you can ensure that your displays work harmoniously and align with your workflow. Follow these steps to adjust the projection settings and screen orientation:
Step 1: Open the Display settings
Right-click on the desktop and select Display settings from the context menu to open the Display settings window.
Step 2: Select the ‘Project to a Second Screen’ option
In the Display settings window, scroll down to the Multiple displays section and click on the dropdown menu. Select the ‘Extend’ option to project the desktop across all connected monitors.
Step 3: Choose the desired projection mode
Once you have selected the ‘Extend’ option, you can choose from different projection modes. Duplicate mode displays the same content on all monitors, extend mode expands the desktop across all monitors, and second screen only mode turns off the laptop’s display and only uses the external monitors.
Select the projection mode that suits your workflow and preferences. You can experiment with different modes to find the one that works best for you.
Step 4: Set the screen orientation
If you need to adjust the screen orientation of any of the monitors, click on the monitor you want to change in the Display settings window. Scroll down to the Orientation section and select the desired orientation from the dropdown menu. You can choose from landscape, portrait, landscape (flipped), or portrait (flipped) orientations.
Make sure to apply the changes and test the screen orientation to ensure that it aligns with your needs.
By following these steps, you can customize the projection settings and screen orientation to create a personalized and efficient dual monitor setup. In the next section, we will explore the use of a USB splitter adapter for additional ports.
Using a USB Splitter Adapter for Additional Ports
If you find yourself running out of ports for accessories like a keyboard, mouse, or USB drive, a USB splitter adapter can be a convenient solution. Here’s how you can use a USB splitter adapter to add additional ports:
Introduction to USB splitter adapter
A USB splitter adapter is a device that allows you to expand the number of USB ports on your laptop or device. It typically has multiple USB ports, both USB 2.0 and USB 3.0, allowing you to connect multiple accessories simultaneously.
Connecting the USB splitter adapter
To use a USB splitter adapter, simply plug it into one of the available USB ports on your laptop or device. Make sure the connection is secure and stable.
Managing ports for accessories
Once the USB splitter adapter is connected, you can use the additional USB ports to connect accessories such as a keyboard, mouse, USB drive, or any other USB-enabled device. This eliminates the need for constantly plugging and unplugging devices and provides a centralized hub for all your accessories.
When connecting accessories, make sure to distribute them across the available USB ports on the splitter adapter to ensure optimal performance. Some USB splitter adapters even have additional features like an Ethernet port or audio output, providing even more functionality.
Using a USB splitter adapter can simplify cable management and provide a convenient solution for adding more ports to your dual monitor setup.
In the next section, we will explore more expensive options for a dual or triple monitor setup, including high-performance docking stations.
Exploring Expensive Options
While the previously discussed adapter options are affordable and practical for most users, there are more expensive options available for users who require additional features or higher performance. Here’s an introduction to high-performance docking stations:
Introduction to high-performance docking stations
A high-performance docking station is a comprehensive solution for users who need to connect multiple monitors, peripherals, and devices to their laptop. These docking stations typically utilize a USB C or Thunderbolt 3 connection to provide a wide range of connectivity options.
High-performance docking stations offer a multitude of ports, including multiple HDMI or DisplayPort outputs for connecting multiple monitors, USB ports for connecting peripherals, Ethernet ports for wired network connectivity, and audio jacks for connecting speakers or headphones. Some docking stations even provide charging capabilities for laptops and other devices.
Benefits of using a docking station
The main benefit of using a docking station is the convenience and simplicity it provides. Instead of dealing with multiple adapters and cables, a docking station eliminates the need for excessive cable management and creates a central hub for all your devices.
Docking stations also offer advanced features and capabilities, such as support for higher-resolution displays, faster data transfer speeds, and compatibility with various devices and operating systems. This makes docking stations ideal for power users, professionals, and gamers who require high-performance and extensive connectivity options.
Considerations for choosing a docking station
When choosing a docking station, there are a few key considerations to keep in mind. Firstly, ensure that the docking station is compatible with your laptop or device. Check for compatibility with the USB C or Thunderbolt 3 port and any specific requirements or limitations.
Secondly, consider the number and types of ports required for your setup. Determine how many monitors you need to connect and what other peripherals or devices you plan to use. Look for a docking station that offers the necessary ports and meets your specific requirements.
Lastly, consider the overall performance and build quality of the docking station. Look for reputable brands and read reviews to ensure that the docking station delivers on its promises and offers reliable performance.
Keep in mind that high-performance docking stations are generally more expensive than simple adapters or splitters. Evaluate your needs and budget to determine whether investing in a docking station is the right choice for you.
In the final section of this article, we will provide a summary of the dual monitor setup process and make a recommendation for non-gaming purposes.
Conclusion
Setting up a dual monitor system for a laptop with a single USB C port on Windows 10 is a straightforward process that can greatly enhance your productivity and computing experience. By following the steps outlined in this article, you can successfully connect and configure multiple monitors, adjust projection settings, and maximize your screen real estate.
For users on a budget or with basic needs, adapter options such as a USB C to USB C charging input HDMI and USB 3.0 port adapter or an HDMI female to USB 3.0 male adapter offer affordable and practical solutions.
If you require additional ports for accessories or have more complex connectivity requirements, a USB splitter adapter can provide the necessary expansion.
For users seeking high-performance and extensive connectivity options, consider investing in a high-performance docking station. These docking stations offer advanced features, multiple ports, and a centralized hub for all your devices.
In summary, a dual monitor setup on a laptop with a single USB C port is achievable and highly beneficial for non-gaming purposes. Whether you choose the affordable adapter options, opt for a USB splitter adapter, or invest in a high-performance docking station, the choice ultimately depends on your specific needs, budget, and desired level of performance.
We hope this comprehensive article has provided valuable insights and guidance for creating an efficient and effective dual monitor setup. Enjoy the enhanced productivity and visually immersive experience that dual monitors can offer!
A complete & detailed dual monitor setup tutorial for a laptop with a single USB C port on Windows 10. In a previous video, I addressed this topic, but many of you requested to see how I attached the monitors to the laptop using various adapters. So, here it is. I hope you find this video helpful. Please like and share it as much as you can and also check out my other multiple monitor videos.
- My favorite multi-monitor setup docking station: 4URPC Dual/Triple Monitor 15in1 USB-C…
- Best/cheapest dual/triple monitor adapter: Dual Monitor Setup For Laptops
- Triple monitor setup video: Triple Monitor Setup Under $50!
- Multiple monitor setup settings: Settings for Dual Monitor Setup Windows…
- Dual display setup for a laptop with single USB C port: How to setup Dual Monitors to a laptop…
- Dual display setup for a laptop with 1 HDMI port: How To Connect Two Monitors To One La…
Please subscribe to my YouTube channel for more videos like this. It’s free! Subscribe to Vidstube
Don’t forget to subscribe to my other YouTube channel for short videos. It’s free too! Subscribe to Vidstube Shorts
Check out the official website of this channel: Vidstube Official Website
Hot deals on our storefront. Check it out: Vidstube Storefront on Amazon
Check out hot deals for cables used in this video:
- 16in1 Quad Monitor Thunderbolt 4 Docking station: Link to product on QGeeM
- Other QGeeM products on Amazon: QGeeM on Amazon
- Multiple Monitor Docking Stations: Link to QGeeM Docking Stations
- Ultimate Gaming triple display compatible USB C docking station: Link to product on Amazon
- Wavlink Universal USB 3.0 Dual Video Docking Station HDMI, USB hub, charging, LAN: Link to product on Amazon
- Plugable USB 3.0 Universal Laptop Docking Station Dual video HDMI/DVA/VGA, LAN,Audio, 6 USB port: Link to product on Amazon
- WAVLINK dual display compatible USB C docking station: Link to product on Amazon
- USB C to HDMI 4K Video+USB 3.0 adapter: Link to product on Amazon
- USB 3.0 male To HDMI female adapter 1080p: Link to product on Amazon
- ICZI USB 3.0 to x 4 USB 3.0 port: Link to product on Amazon
- DVI to HDMI male adapter: Link to product on Amazon
- VGA to HDMI male adapter: Link to product on Amazon
- USB 3.0 to Gigabit Ethernet cable: Link to product on Amazon
Try out Prime for free 30 days: Free Amazon Prime Trial
Follow VidsTube on other social media platforms for direct contact and early sneak peeks. It’s free! VidsTube’s Other Social Media Accounts
Check out my detailed tech comparison playlist: Watch Comparison Playlist
Fitbit Versa, Versa Lite, Ionic playlist: Fitbit Vids Playlist
Tech reviews & computing playlist: Computing Vids Playlist
Samsung Galaxy Watch playlist: Samsung Watch Playlist
Fossil smartwatches & accessories playlist: Fossil Vids Playlist
Huawei smartwatch playlist: Huawei Vids Playlist
Crazy bizarre tech videos: Bizarre Tech Playlist
DISCLAIMER: Some of these links are affiliate links, which means that if you purchase from one of the product links, I’ll receive a small commission at no cost to you. I did not make this video or any of the videos with the intent to influence you to purchase the reviewed product. If you do make a purchase, the money earned will help continue supporting the channel. Thanks!


